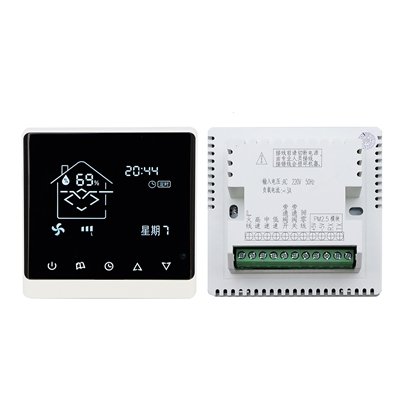
8826XF Fresh Air System Controller
Key Specifications
· Fresh air system controller with ventilation and air quality functions
· High/Medium/Low fan speed · Bypass valve switch
· Filter replacement reminder · Timing switch (on/off)
· Temperature and humidity detection function
· Optional PM2.5 detection model
· 86×86×44mm · 200g
Why Choose 8826XF
· Three Fan Speeds – High/Medium/Low speed control for flexible ventilation
· Bypass Valve Control – Built-in bypass valve switch for energy recovery or pressure relief
· Filter Reminder – Alerts when filter needs replacement to maintain air quality
· Timer Scheduling – Programmable on/off timing for automatic operation
· Temp & Humidity Detection – Monitors room temperature and humidity in real time
· PM2.5 Detection (Optional) – Optional model for monitoring fine particulate matter
· Compact Size – 86×86×44mm fits standard wall boxes
· Sturdy Build – 200g for reliable quality
Operation Functions
1. Manual Mode Operation Logic
The unit operates at the fan speed set by the user in Manual mode.
2. Timer Mode Operation Logic
In Timer mode, the fan speed is automatically run based on the user-configured ON and OFF times.
3. Auto Mode Operation Logic
In Auto mode, the fan speed is automatically adjusted according to the indoor PM2.5 level:
Fan stops when PM2.5 < 15
Fan runs at low speed when PM2.5 is between 16 ~ 50
Fan runs at medium speed when PM2.5 is between 51 ~ 100
Fan runs at high speed when PM2.5 > 101
(Note: This function is only available with the optional PM2.5 module.)
4. Fan Speed Setting
When the unit is powered on, short-press the Up/Down keys to cycle through High, Medium, Low, and Off speeds.
(Note: Fan speed can only be adjusted in Manual mode; switching is disabled in Auto and Timer modes.)
5. Bypass Damper ON/OFF
Press and hold the Mode key for 3 seconds while the unit is powered on to enable or disable the bypass damper.
6. Check Filter Runtime
Press and hold the Clock key for 3 seconds while the unit is powered on to view the filter’s total operating hours.
7. Clear Filter Runtime
Press and hold the Clock key for 5 seconds while the unit is powered on to reset the filter’s operating hour counter.
8. Time & Timer Setting
With the unit powered on, short-press the Clock key to enter the time adjustment menu. Press the Clock key again to cycle through adjustable items: Weekday, Current Time, Timer ON Time, Timer OFF Time, and Fan Speed during scheduled periods.
9. RS485 Communication Address Setting
With the unit powered on, press and hold the Mode and Clock keys together for 5 seconds to enter the hexadecimal RS485 address configuration interface. Adjust the address using the Up/Down keys, switch the digit position with the Mode key, and press the Power key to save and exit.
(Note: This function is only available on units equipped with the optional RS485 module.)
10. Restore Factory Settings
With the unit powered on, press and hold the Power and Up keys together for 5 seconds. The full-screen display will blink to confirm that factory defaults have been restored.
11. Sensor Fault Alarm
Temperature sensor failure triggers an error code E alarm.
Humidity sensor failure triggers an error code H alarm.
12. Filter Alarm
The filter icon flashes when the filter runtime reaches 1000 hours, while the fan continues normal operation.
The filter icon stays on continuously when the filter runtime reaches 3000 hours, prompting the user to clean or replace the filter.